Why Continuous Spraying Demands Precise Air Compressor Sizing
Selecting the right air compressor for spray painting is far more than a simple purchase; it’s a critical investment in the quality of your finish and the efficiency of your workflow. For applications requiring continuous spraying, the stakes are even higher. An improperly sized compressor can turn a promising project into a frustrating cycle of inconsistent results, workflow interruptions, and costly rework. This reality is underscored by the significant growth in the tools themselves; the global paint spraying equipment market is projected to reach USD 5.79 Billion by 2033, highlighting an increasing demand for the professional results that only the right equipment can deliver.
The Frustration of Under-Sizing: Inconsistent Results and Workflow Interruptions
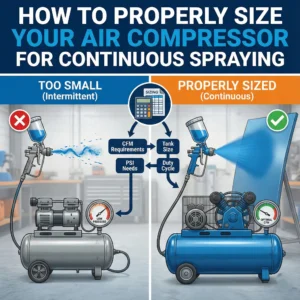
Imagine you’re halfway through applying a perfect topcoat on a large project. Suddenly, your spray gun sputters, the paint atomization falters, and the finish becomes uneven. This is the classic symptom of an undersized air compressor. When the tool’s demand for compressed air exceeds the compressor’s supply capacity, pressure drops, leading to poor paint application, runs, and an orange-peel texture. The compressor motor runs constantly, trying to keep up, risking overheating and premature failure while you wait for the pressure to rebuild.
What This Guide Will Cover: Achieving Uninterrupted Performance for Flawless Finishes
This guide is designed to eliminate that guesswork. We will move beyond simplistic metrics like horsepower and delve into the critical specifications that truly define a compressor’s ability to support continuous spraying. We will cover the core principles of air demand, decode the essential metrics of CFM and PSI, explore the importance of duty cycle and tank size, and provide a step-by-step process to ensure you select an air compressor that delivers a steady, uninterrupted flow of air for a flawless finish every time.
The Core Principle: Understanding Your True Air Demand for Spray Painting
The fundamental rule of sizing an air compressor is simple: the compressor must supply more air volume than your tools consume. For continuous spray painting, your spray gun is the most demanding tool. Unlike a nail gun that requires short bursts of air, a paint sprayer needs a sustained, consistent volume of compressed air to maintain perfect atomization and a steady spray pattern from start to finish.
The Foundation of Performance: Decoding Cubic Feet Per Minute (CFM) for Spraying
While many factors contribute to compressor performance, one metric stands above all others for continuous applications: Cubic Feet per Minute (CFM). This measurement represents the volume of air a compressor can deliver at a specific pressure level.
What is CFM and Why it’s the Lifeblood of Your Spray Gun?
CFM is the true measure of an air compressor’s output capacity. Think of it as the amount of work the compressor can do over time. A spray gun might require a certain pressure (PSI) to function, but it’s the continuous flow (CFM) that allows it to operate without interruption. If the CFM rating of your compressor is lower than the CFM requirement of your spray gun, the compressor will be unable to replenish the air in the tank as fast as you use it, leading to inevitable pressure drops and poor performance.
Pinpointing Your Spray Gun’s CFM Requirements
Every air tool, including your paint sprayer, has a specific CFM requirement listed by the manufacturer, usually specified at a certain PSI (e.g., 10 CFM @ 90 PSI). You can find this information in the tool’s manual, on the manufacturer’s website, or sometimes printed on the tool itself. This number is your starting point and the most crucial piece of data for proper sizing. High-volume, low-pressure (HVLP) spray guns, for instance, can be particularly demanding in terms of air volume.
Accounting for All Air-Consuming Devices in Your Spraying System
Are you only running a spray gun? Or will a die grinder, sander, or nail gun also be in use simultaneously? To determine your total air demand, you must add the CFM requirements of all tools that will be operating at the same time. Ignoring other tools is a common mistake that leads to an undersized system.
Calculating Your Total Effective CFM for Continuous Workflow
Once you have the total CFM requirement for your tools, the calculation isn’t finished. It is essential to add a safety margin of at least 30-50%. This buffer accounts for several factors: potential air leaks in your system, a loss of compressor efficiency over time, and the possibility of adding more demanding tools in the future. For example, if your spray gun needs 12 CFM, a safe target for your compressor’s CFM rating would be 16-18 CFM at the required PSI.
Mastering Pressure (PSI): The Key to Perfect Atomization and Paint Transfer
While CFM dictates the volume, Pounds per Square Inch (PSI) represents the force of the compressed air. Getting the pressure right is essential for atomizing the paint correctly and achieving an even, professional-grade finish.
Understanding PSI: Its Critical Role in Paint Atomization and Finish Quality
PSI is the measure of air pressure delivered by the compressor. For spray painting, this pressure forces the paint through the nozzle of the spray gun, breaking it into a fine mist (atomization). Too little pressure results in large droplets, an uneven pattern, and a textured, “orange peel” finish. Too much pressure can create excessive overspray, waste paint, and lead to runs or sags. Each spray gun has an optimal operating pressure range specified by the manufacturer.
The Importance of Consistent Working Pressure Throughout Your Spraying Session
The key is not just reaching the target PSI, but maintaining it consistently. Any fluctuation in air pressure at the nozzle will alter the spray pattern and the quality of the atomization. This is where having sufficient CFM is critical; a compressor with adequate CFM capacity can maintain a stable working pressure even when the trigger on the spray gun is held down for long periods.
Combating Pressure Drop: Maintaining Optimal PSI from Compressor to Nozzle
Pressure drop is the gradual loss of air pressure as it travels from the compressor tank through hoses, fittings, and filters to the tool. A long or narrow-diameter air hose is a common culprit. To combat this, use a shorter, wider-diameter hose (e.g., 3/8-inch instead of 1/4-inch) and ensure all fittings are properly sized and sealed. Always set the regulator at the compressor slightly higher than the tool’s requirement to compensate for this expected drop.
The Duty Cycle Deep Dive: Sustaining Continuous Performance Without Overheating
The duty cycle is a rating that tells you how long a compressor can run within a given period before it needs to cool down. For continuous spraying, this is a non-negotiable specification.
What is Compressor Duty Cycle and Why it’s Crucial for Spraying?
Duty cycle is expressed as a percentage. A compressor with a 50% duty cycle should run for no more than five minutes out of a ten-minute cycle. Pushing a compressor beyond its rated duty cycle will cause it to overheat, leading to excessive wear and premature failure. Continuous spray painting places a constant demand on the compressor, making a high duty cycle essential.
Reciprocating (Piston) Compressors: Understanding Their Limitations for Continuous Spraying
Most consumer-grade and light commercial compressors are reciprocating (or piston) compressors. These are effective for intermittent tasks like using a nail gun, but they typically have a duty cycle between 50% and 75%. While a large tank can help, a standard piston compressor will struggle to keep up with the demands of continuous professional spraying and will be forced to run beyond its design limits.
Rotary Screw Air Compressors: The Ideal Choice for High-Demand, Continuous Spraying
For true continuous operation, rotary screw air compressors are the superior choice. These machines are engineered to run at a 100% duty cycle, meaning they can operate continuously without needing a cool-down period. Rotary screw compressors are quieter, more energy-efficient for high-demand applications, and built for the rigors of an industrial or professional auto body environment where uptime is critical.
Tank Size: Your Air Reservoir for Uninterrupted Spraying Flow
The air receiver tank stores compressed air, acting as a buffer between the compressor pump and your tool. While important, the tank size is often misunderstood.
The Role of Air Receiver Tanks in Buffering Your Spraying Performance
The primary role of the tank is to provide a reservoir of compressed air to handle initial or sudden surges in demand. This prevents the compressor motor from starting and stopping every time you pull the trigger.
How Tank Size Mitigates Compressor Cycling and Ensures Consistent Air Delivery
A larger tank allows the compressor pump to run for longer, more efficient cycles rather than short, frequent bursts. This reduces wear on the motor and electrical components. For example, a documented case showed an auto body shop that upgraded from a 30-gallon to a 60-gallon tank saw a 25% reduction in compressor cycling. For continuous spraying, a larger tank helps smooth out the air delivery, but it cannot compensate for a pump with an inadequate CFM rating. The pump must still be able to produce more air than the tool consumes.
Sizing Your Air Tank for Continuous Spraying: Beyond the Basics
For continuous, high-volume spraying, a larger tank (60-80 gallons or more) is highly recommended. It provides a more stable pressure reserve and reduces the strain on the compressor. However, remember the golden rule: Tank Size supports CFM, it does not replace it. A massive tank paired with a low-CFM pump will still eventually run out of air during a long spraying session.
Beyond Airflow and Pressure: Essential Considerations for Flawless Spraying
Achieving a perfect finish involves more than just air volume and force. The quality of the compressed air and the integration of your system are equally vital.
Ensuring Pristine Air Quality: The Impact of Moisture and Oil on Paint Finish
Compressed air naturally contains moisture, and oil-lubricated compressors can introduce tiny oil particles into the airline. Both contaminants are disastrous for a paint job, causing defects like “fisheyes,” blistering, and poor adhesion. Installing an in-line air filter and dryer system is essential to remove water, oil, and particulates, ensuring the air reaching your spray gun is clean and dry.
Powering Your Compressor: Electric vs. Gas-Powered for Spraying Workflows
For stationary workshop applications, electric compressors are the standard. They are quieter, produce no exhaust fumes, and are generally more cost-effective to run. Gas-powered compressors offer portability for job sites without reliable electricity but require proper ventilation and are much louder. For a dedicated spray booth, an electric model is the clear choice.
System Integration: How All Components Work Together for Optimal Performance
A high-performance spraying system is more than just a compressor and a gun. It includes properly sized hoses, high-flow fittings, regulators, and a robust air filtration system. Each component must be selected to support the required CFM and PSI without creating bottlenecks that choke the airflow to your tool.
Putting It All Together: A Step-by-Step Sizing Guide for Your Spraying Needs
Follow these steps to confidently size your air compressor for continuous performance.
Step 1: Document All Your Air-Consuming Tools and Their Individual CFM/PSI Demands
Create a list of every air tool you plan to use. Next to each tool, write down its required CFM and PSI, found in the manufacturer’s specifications. Pay closest attention to your primary spray gun, as it will likely be the most demanding.
Step 2: Determine Your Continuous “Trigger Time” and Project Duration
Be realistic about your workflow. Are you painting small parts with breaks in between, or are you spraying large panels, vehicles, or cabinetry where the trigger will be engaged for several minutes at a time? This will help you decide if a 100% duty cycle rotary screw compressor is a necessity.
Step 3: Calculate Your Total Effective CFM and PSI Requirements (Including Safety Margins)
Sum the CFM of all tools that will run simultaneously. Then, multiply that total by 1.5 (a 50% safety margin) to get your target compressor CFM. Ensure the compressor’s maximum pressure rating is well above the highest PSI requirement of any of your tools. This methodical approach ensures your new air compressor will be an asset, not a bottleneck, in your pursuit of the perfect finish.
Conclusion
Sizing an air compressor for continuous spraying is a process of matching supply with demand. It requires moving beyond simple horsepower ratings and focusing on the three pillars of performance: sufficient CFM to meet the tool’s constant consumption, stable PSI for perfect atomization, and a duty cycle capable of handling a non-stop workflow. By meticulously calculating your total air demand, adding a safety margin, and choosing the right type of compressor—often a rotary screw model for professional applications—you are not just buying a piece of equipment. You are investing in workflow efficiency, finish quality, and the long-term reliability of your operations. An undersized compressor leads to frustration and rework, while a correctly sized system empowers you to achieve flawless, uninterrupted results on every project.
 The Role of Exhaust Filters in Protecting Your Shop and the Environment
  The True Cost of Running a Paint Booth with Clogged Filters
  How to Improve Shop Efficiency with the Right Paint Booth Accessories
  How Regular Filter Changes Save Your Shop Time and Money